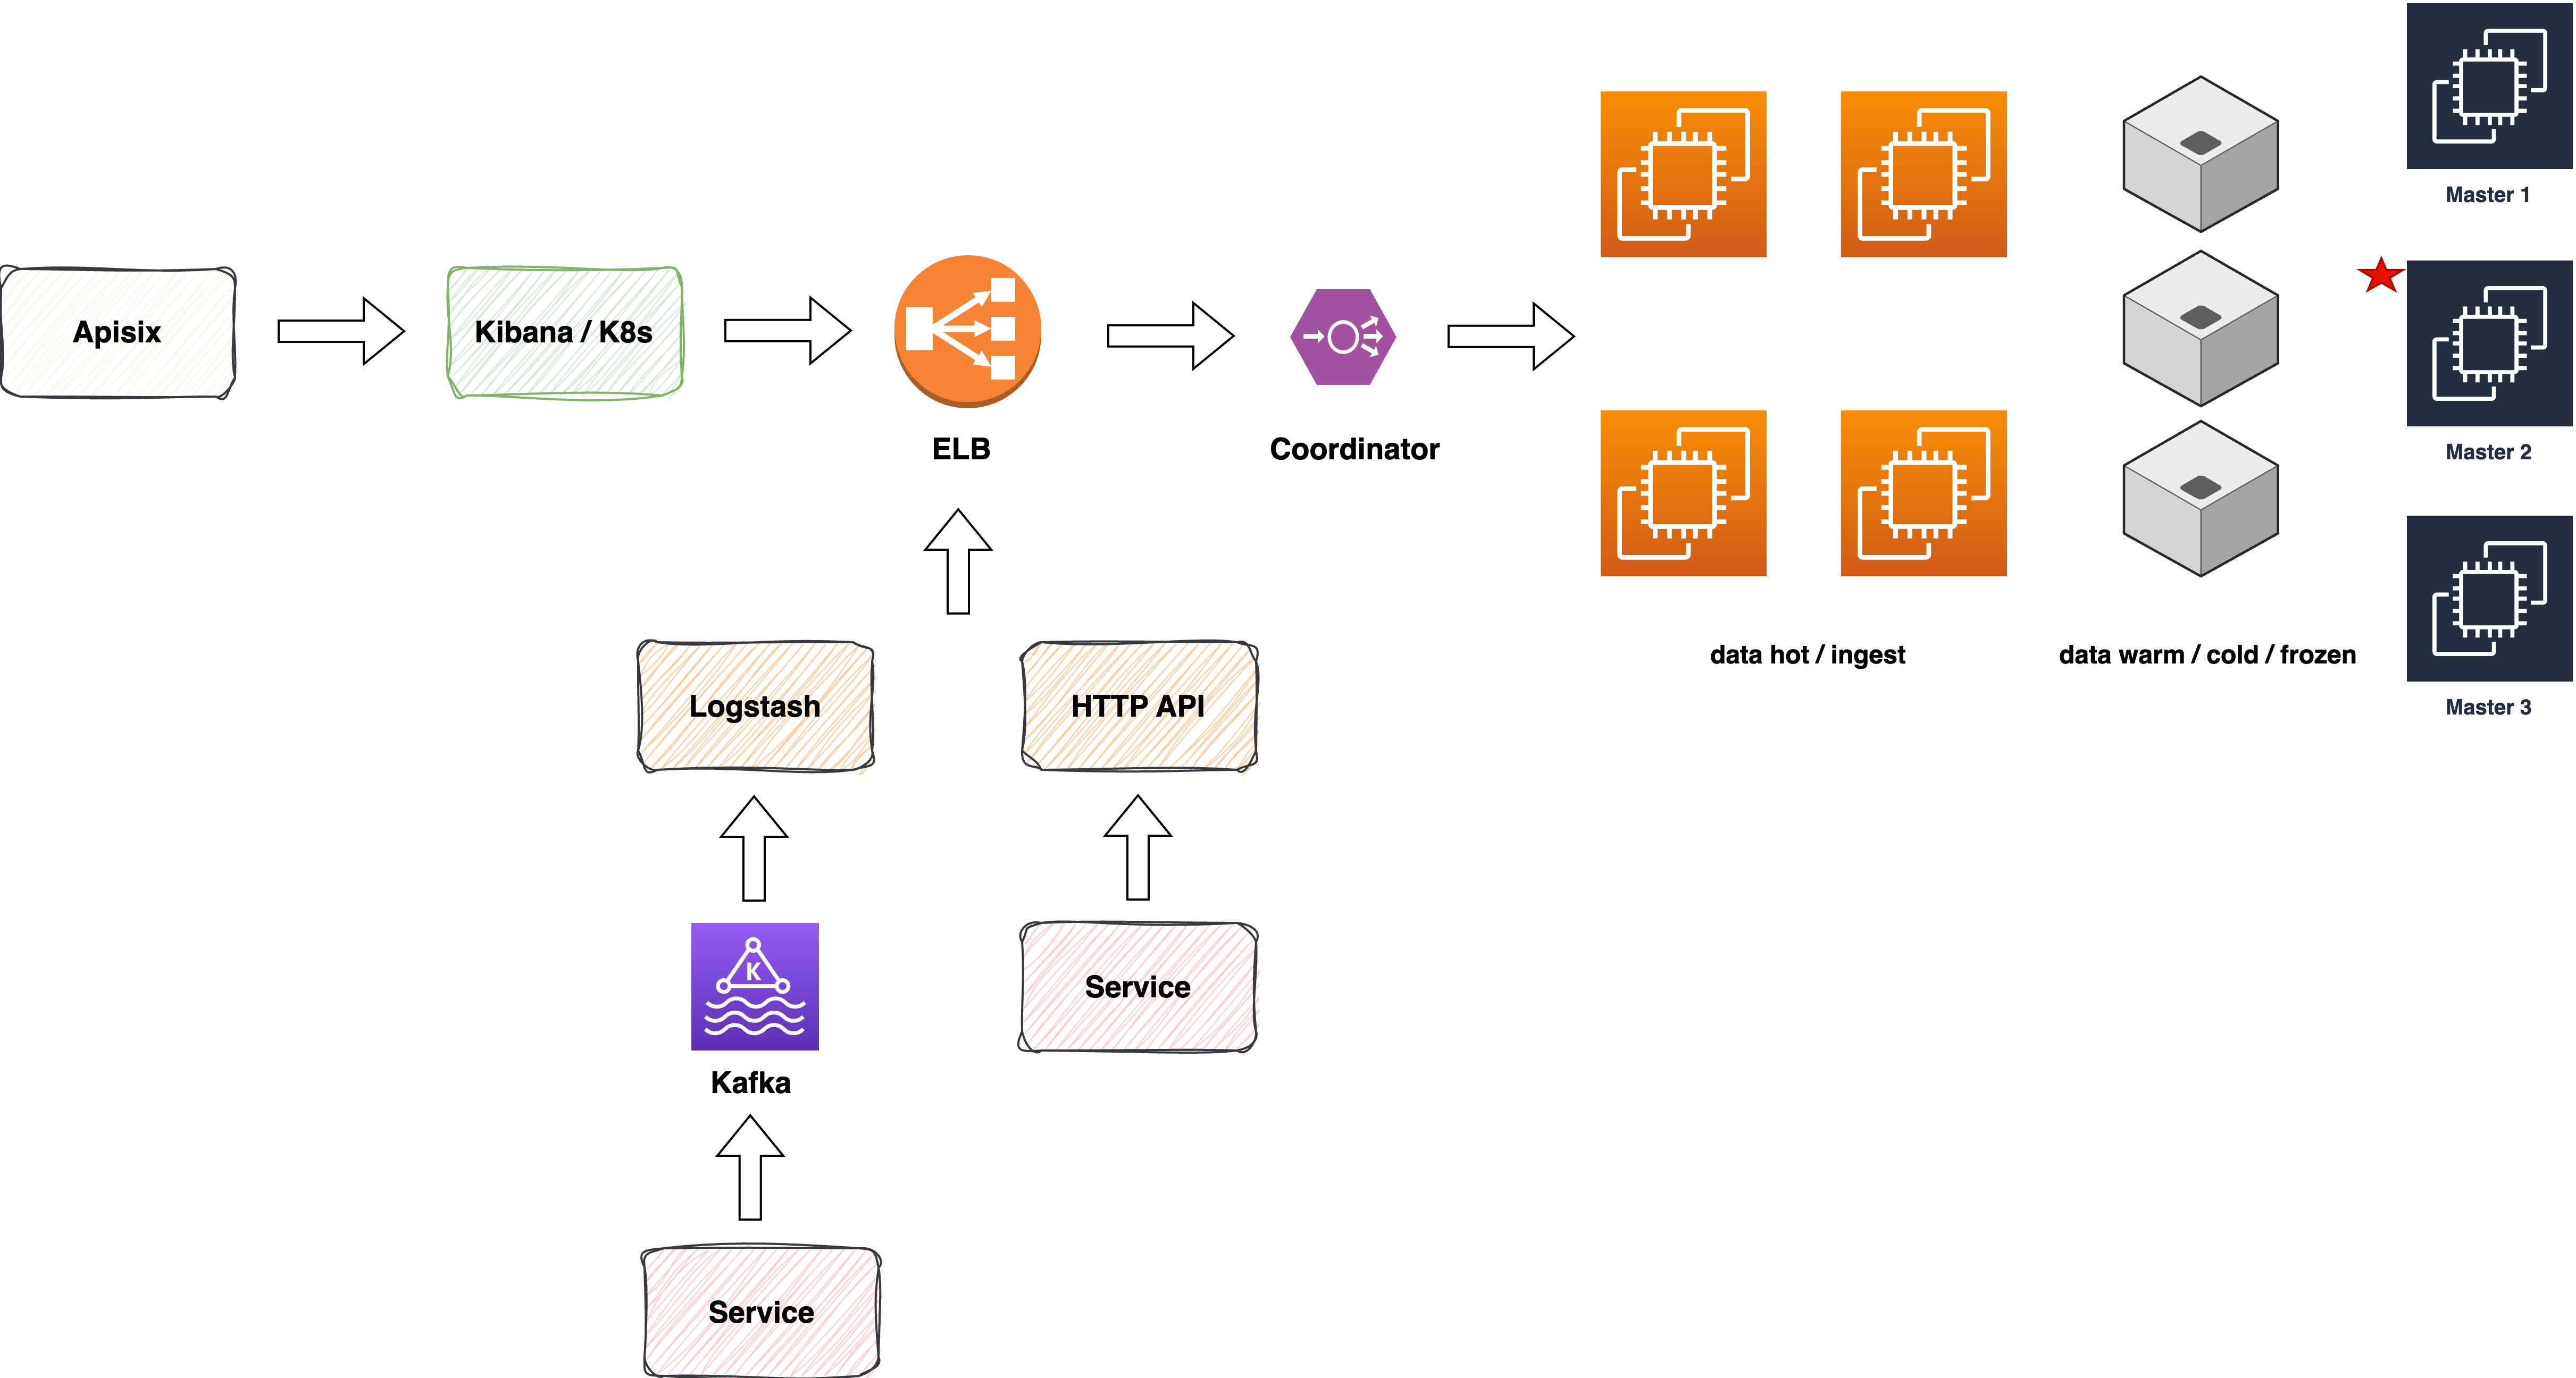
本文介绍了在 AWS 上安装与配置 ElasticSearch 集群,并通过 ALB 做负载均衡。同时,采用 filebeat 采集各节点的日志用于问题的分析与定位。
节点
节点角色
| 角色 |
简称 |
备注 |
| master |
m |
主节点 |
| data |
d |
数据节点 |
| data_content |
s |
内容数据节点 |
| data_hot |
h |
热点数据节点 |
| data_warm |
w |
中温数据节点 |
| data_cold |
c |
冷数据节点 |
| data_frozen |
f |
封存数据节点 |
| ingest |
i |
数据处理节点 |
| ml |
l |
机器学习节点 |
| remote_cluster_client |
r |
远程候选节点 |
| transform |
t |
转换节点 |
| voting_only |
v |
仅投票节点 |
| coordinator |
/ |
仅协调节点 |
一个集群必须有以下角色:
master- (
data_content & data_hot) OR data,不可同时设置为 data 和 data_ 节点
- 候选主节点:
1
2
3
4
| node.roles: [master]
node.role: [master, voting_only]
|
节点配置
硬件配置
| 角色 |
存储 |
内存 |
计算 |
网络 |
描述 |
| 主节点 |
低 |
低 |
低 |
中 |
管理集群状态 |
| 数据节点 |
极高 |
高 |
高 |
中 |
存储和检索数据 |
| Ingest 节点 |
低 |
中 |
高 |
中 |
转换输入数据 |
| 机器学习节点 |
低 |
极高 |
极高 |
中 |
机器学习 |
| 协调节点 |
低 |
中 |
中 |
中 |
请求转发和合并检索结果 |
注意事项:
实际配置
- 3 个主节点
- 4 个热数据节点
- 3 个温/冷/冻结数据节点
- 2 个协调节点
| Role |
Instance |
CPU |
Memory |
Disk |
Count |
| master |
m6g.large |
2 |
8GB |
50GB/gp3 |
3 |
| coordinator |
m6g.xlarge |
4 |
16GB |
50GB/gp3 |
2 |
data_hot
ingest |
r6g.xlarge |
4 |
32GB |
1TB/gp3 |
4 |
data_warm
data_cold
data_frozen |
r6g.xlarge |
4 |
32GB |
50GB/gp3
10TB/HDD |
3 |
部署
基本配置
- 创建用户 elastic,
sudo useradd -m -s /bin/bash elastic,elasticsearch 进程以该用户运行
- 安装工具
1
2
3
4
| sudo apt install build-essential net-tools
sudo snap install nvim --classic
sudo mkdir -p /opt/elasticsearch/data /opt/elasticsearch/logs
sudo chown elastic:elastic -R /opt/elasticsearch
|
- 修改机器的 hostname,如
sudo hostnamectl set-hostname es-master-01
- 修改虚拟内存,将
vm.max_map_count = 262144 添加到配置文件 /etc/sysctl.conf中,并执行 sudo sysctl -p
- 将如下配置添加到每个节点的
/etc/hosts 文件中1
2
3
| 172.x.x.x es-master-01
172.x.x.x es-master-02
172.x.x.x es-master-03
|
- 版本 elasticsearch-8.8.2-linux-aarch64.tar.gz
1
2
3
4
5
6
|
sudo su - elastic
wget -O elasticsearch-8.8.2-linux-aarch64.tar.gz https://artifacts.elastic.co/downloads/elasticsearch/elasticsearch-8.8.2-linux-aarch64.tar.gz
tar -xvf elasticsearch-8.8.2-linux-aarch64.tar.gz
|
- 生成 TLS 证书,各节点之间交互使用 9300/TLS 端口 security-basic-setup
1
2
3
4
5
6
7
8
|
cd elasticsearch-8.8.2
./bin/elasticsearch-certutil ca
./bin/elasticsearch-certuil cert --ca elastic-stack-ca.p12
|
master 节点
- 节点命名规则:es-master-01、es-master-02…
配置
- 第一次启动 es-master-01 的时候加入 cluster.initial_master_nodes 配置,待节点启动成功后,可以删除该配置并重新启动节点
1
2
3
4
5
6
7
8
9
10
11
12
13
14
15
16
17
18
19
20
21
22
23
24
25
26
27
28
29
30
31
32
33
34
35
| cluster.name: es-demo
node.name: <节点的名字, 如 es-master-01>
node.attr.rack: us-west-1
node.roles:
- master
path:
data: /opt/elasticsearch/data
logs: /opt/elasticsearch/logs
network.host: 0.0.0.0
http.port: 9200
transport.port: 9300
discovery.seed_hosts:
- es-master-01
- es-master-02
- es-master-03
cluster.initial_master_nodes:
- es-master-01
xpack.security.enabled: true
xpack.security.enrollment.enabled: true
xpack.security.http.ssl:
enabled: false
xpack.security.transport.ssl:
enabled: true
verification_mode: certificate
client_authentication: required
keystore.path: certs/elastic-certificates.p12
truststore.path: certs/elastic-certificates.p12
|
热数据节点
热数据节点同时需要包含 data_content & data_hot 2 个角色,同时为了简化部署将 ingest 角色也添加到热数据节点
- 角色:data_content、data_host、ingest
- 节点命名规则:es-data-01、es-data-02…
配置
1
2
3
4
5
6
7
8
9
10
11
12
13
14
15
16
17
18
19
20
21
22
23
24
25
26
27
28
29
30
31
32
33
| cluster.name: es-demo
node.name: <节点的名字, 如 es-data-01>
node.attr.rack: us-west-1
node.roles:
- data_content
- data_hot
- ingest
path:
data: /opt/elasticsearch/data
logs: /opt/elasticsearch/logs
network.host: 0.0.0.0
http.port: 9200
transport.port: 9300
discovery.seed_hosts:
- es-master-01
- es-master-02
- es-master-03
xpack.security.enabled: true
xpack.security.enrollment.enabled: true
xpack.security.http.ssl:
enabled: false
xpack.security.transport.ssl:
enabled: true
verification_mode: certificate
client_authentication: required
keystore.path: certs/elastic-certificates.p12
truststore.path: certs/elastic-certificates.p12
|
冷数据节点
- 需要先挂载 HDD 硬盘到
/opt/elasticsearch/data 目录,如果条件允许可以直接使用 gp3 的 EBS
- 节点命名规则:es-data-wcf-01、es-data-wcf-02…
如何挂载 HDD 硬盘
- EBS 上新建 10TB HDD 存储,HDD 要和所需挂载的 EC2 在一个可用区
- 通过控制台将 HDD attach 到指定的 EC2
- 在 EC2 上执行如下操作
1
2
3
4
5
6
7
8
9
10
11
12
13
14
15
16
17
18
19
20
21
22
23
24
25
| $ lsblk
NAME MAJ:MIN RM SIZE RO TYPE MOUNTPOINTS
nvme0n1 259:0 0 50G 0 disk
├─nvme0n1p1 259:1 0 49.9G 0 part /
└─nvme0n1p15 259:2 0 99M 0 part /boot/efi
nvme1n1 259:3 0 10T 0 disk
$ sudo file -s /dev/nvme1n1
/dev/nvme1n1: data
$ sudo mkfs -t ext4 /dev/nvme1n1
$ sudo mount /dev/nvme1n1 /opt/elasticsearch/data
$ sudo chown elastic:elastic -R /opt/elasticsearch/data
$ sudo blkid
/dev/nvme1n1: UUID="xxxxx" BLOCK_SIZE="4096" TYPE="ext4"
$ 修改 /etc/fstab,加入如下字段
UUID="xxxxx" /opt/elasticsearch/data ext4 defaults 0 2
$ sudo umount /opt/elasticsearch/data
$ sudo mount -a
|
配置
1
2
3
4
5
6
7
8
9
10
11
12
13
14
15
16
17
18
19
20
21
22
23
24
25
26
27
28
29
30
31
32
33
| cluster.name: es-demo
node.name: <节点的名字, 如 es-data-wcf-01>
node.attr.rack: us-west-1
node.roles:
- data_warm
- data_cold
- data_frozen
path:
data: /opt/elasticsearch/data
logs: /opt/elasticsearch/logs
network.host: 0.0.0.0
http.port: 9200
transport.port: 9300
discovery.seed_hosts:
- es-master-01
- es-master-02
- es-master-03
xpack.security.enabled: true
xpack.security.enrollment.enabled: true
xpack.security.http.ssl:
enabled: false
xpack.security.transport.ssl:
enabled: true
verification_mode: certificate
client_authentication: required
keystore.path: certs/elastic-certificates.p12
truststore.path: certs/elastic-certificates.p12
|
协调节点
- 节点命名规则:es-coordinator-01、es-coordinator-02…
配置
1
2
3
4
5
6
7
8
9
10
11
12
13
14
15
16
17
18
19
20
21
22
23
24
25
26
27
28
29
30
| cluster.name: es-demo
node.name: <节点的名字, 如 es-data-wcf-01>
node.attr.rack: us-west-1
node.roles: []
path:
data: /opt/elasticsearch/data
logs: /opt/elasticsearch/logs
network.host: 0.0.0.0
http.port: 9200
transport.port: 9300
discovery.seed_hosts:
- es-master-01
- es-master-02
- es-master-03
xpack.security.enabled: true
xpack.security.enrollment.enabled: true
xpack.security.http.ssl:
enabled: false
xpack.security.transport.ssl:
enabled: true
verification_mode: certificate
client_authentication: required
keystore.path: certs/elastic-certificates.p12
truststore.path: certs/elastic-certificates.p12
|
性能测试
用 esrally 进行性能测试
1
2
3
| cd ~/.local/bin
./esrally race --target-hosts es-nlb:9200 --track=http_logs --client-options="basic_auth_user:'elastic',basic_auth_password:'xxx'" --pipeline=benchmark-only --kill-running-processes
|
监控
- 日志:es log & syslog
- 指标 metrics
日志
采用 filebeat 收集 es 及系统的日志
1
2
3
4
5
6
7
8
| wget -qO - https://artifacts.elastic.co/GPG-KEY-elasticsearch | sudo apt-key add -
sudo apt-get install apt-transport-https
echo "deb https://artifacts.elastic.co/packages/oss-8.x/apt stable main" | sudo tee -a /etc/apt/sources.list.d/elastic-8.x.list
sudo apt update
sudo apt install filebeat=8.8.2
sudo systemctl enable filebeat.service
sudo filebeat modules enable elasticsearch
|
修改 filebeat 配置文件:
/etc/filebeat/filebeat.yml
1
2
3
4
5
6
7
8
9
10
11
12
13
14
15
16
17
18
19
20
21
22
23
| filebeat.inputs:
- type: filestream
id: syslog
paths:
- /var/log/syslog
parsers:
- syslog:
format: auto
output.elasticsearch:
hosts: ["http://localhost:9200"]
protocol: "http"
username: "elastic"
password: "xxxxx"
setup.dashboards.enabled: true
setup.kibana:
host: "kibana_host:5601"
username: "kibana_admin"
password: "xxxxx"
|
/etc/filebeat/modules.d/elasticsearch.yml
1
2
3
4
5
6
| - module: elasticsearch
server:
enabled: true
var.paths:
- /opt/elasticsearch/logs/*.log
- /opt/elasticsearch/logs/*_server.json
|
指标
可以采用 categraf 的 elasticsearch 插件采集各指标
1
2
3
4
5
6
7
8
9
10
11
12
13
14
| [[instances]]
servers = ["http://es-nlb:9200"]
labels = { cluster="elk" }
http_timeout = "10s"
local = false
cluster_health = true
cluster_health_level = "cluster"
cluster_stats = true
indices_level = ""
node_stats = ["jvm", "breaker", "process", "os", "fs", "indices", "thread_pool", "transport"]
username = "elastic"
password = "xxxxx"
|
常用命令
重置密码
1
2
3
4
5
6
| ./bin/elasticsearch-reset-password -u elastic
./bin/elasticsearch-reset-password -i -u elastic
./bin/elasticsearch-reset-password -u kibana_system
|